It's all about "thinking outside the box" when it comes to your dies. I don't know about you, but I have quite the stash! It was so fun to go through my CDD dies and come up with something different! Let's get to it, shall we??
What I'm showing you today is nothing new. It's a technique that has been around for awhile. It's called Punch Art. This is where you create different characters or critters out of paper punches. In this case, we're using our dies. Before I got started, I sketched out the basics of what I wanted to do.


I am a fantastic artist, lol!!! You will notice that the girl in my sketch and what I ended up with are completely different. But that's okay because all the same dies were used :). Before actually cutting up good cardstock, I die cut everything out of copy paper and arranged the pieces to see how things would look and to see if I needed to add or take away anything.


When I was happy with the layout of each, I started die cutting the cardstock. Let's make the bunny first! I cut the smaller scalloped circle from the Stitched in Circles Die set out of white cardstock, this would make the face. For the ears, I used the second smallest oval from the Fancy Stitched Label Dies for the base of the ears, and the smallest oval for the "inside" of the ear.
Before adhering anything together, I added a bit of colour with Tattered Rose Distress Ink to the inner ears and also a bit on the scalloped circle to give a bit of a blush.

I didn't want round shaped eyes as I knew the nose was also going to be round. After going through every CDD die set I have, I settled on one of the tiny elements from the Scene Builder Dies. I cut those out of black cardstock. The nose is from the stars/circle confetti die from the Pocket Pieces Hello Dies. I cut this from white cardstock and added more Tattered Rose.

My bunny was really starting to take shape at this point but I felt it needed a little something more. So I die cut another of the same scalloped circle I used for the head, then took one of the Stitched Scalloped Dies and partially cut that circle down.

This created the look of puffy fur and added a bit more dimension. All that was left to do was glue everything together and add some whiskers!

Oh yeah, and what bunny doesn't need a sweet little bow?? The bow is from the Shaker Tags Die Set and is just the cutest thing, ever!! I foam mounted this cutie onto some grey cardstock that I adhered the largest of the Inside Scalloped Rectangle to. Then everything was put onto a white card base.

The sentiment comes from the JellyBean Kisses stamp set and was heat embossed in white.

Now, let's take a look at the little girl! The majority of this one was made using the Stitched in Circles Die Set!! I used the largest plain, stitched circle die in this set and cut it from some Ivory cardstock. I added some blush to the "cheeks" using the Tattered Rose ink.
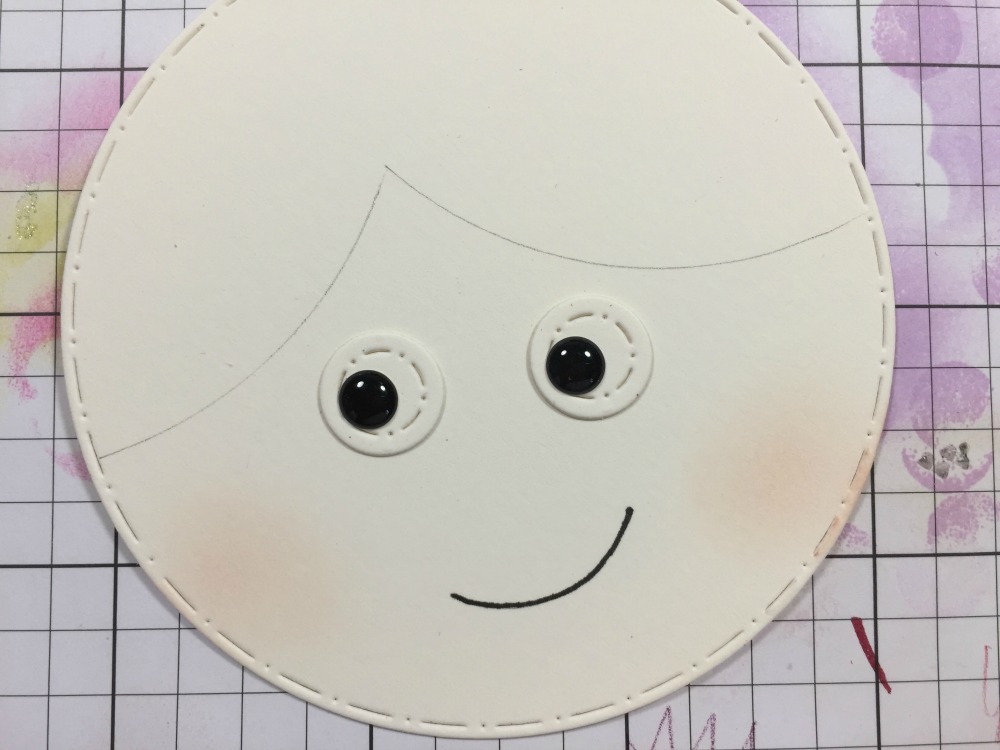
For the eyes, I used the small circle die in the Inside Scalloped Rectangle Dies and added a black enamel dot to each. I used a black marker to draw the smile. The pencil marks you see are going to be where her "bangs" are and were a guide for eye placement.
The bangs were made by cutting the same circle die out of kraft cardstock and partially cutting two pieces. It's so hard to explain so here's a photo..

Whats inside of the die will cut and give you a pointed oval shape. I did this twice making one a bit larger. The rest of her "hair" was made using the largest scalloped die in the Stitched in Circles Set with kraft cardstock as well. I trimmed off the bottom of the die cut with scissors to give it a bob haircut appearance!

I created a shirt for her using some patterned paper from the Kraft in Colour paper pad, also by using the large stitched circle die. To create a bit of interest, I used one of the elements from the Shaker Tags Die Set to give a ruffle look.

The small ivory circle will be used to create a little neck and the flowers are from the Crazy Stitched Frame Dies and will act as accessories ;)!
All the pieces were adhered using liquid glue. This created one large piece that I was able to foam mount to a white, top fold card base.

Here, you can see the ruffle detail on her shirt! I think she turned out super cute!

The sentiment comes from the Say It Big stamp set. I just love how cute those flower look!

Well, that's it for me today!! I hope you got some inspiration on how to look at your dies a bit differently!! These cards were SO MUCH fun to make!!
Thank you for hanging in there!! Until next time...
Laurie
Here's a list of all the CDD Products Used:


My goodness me that gives your dies a really good work out - and your brain! I don't think I could think of that when looking at my die sets. Particularly like the little girl. xx
ReplyDelete