Saturday, April 29, 2017

Simon Says Stamp Wednesday Challenge with Newton's Nook!

Hello everyone!!  Tonight I decided to participate in the Simon Says Stamp Wednesday Challenge!! This time around it's an Anything Goes theme but they are featuring Newton's Nook Stamps.  I love Newton's Nook but I'm afraid the stamps I have are under used :(.  So this challenge was perfect!  Time to show Newton some love!!
While I adore that cat, Newton, I chose to use my all time favourite floral set.  Happy Little Thoughts is a set that has three wreath images, one that is full of flowers and the other two give you the opportunity to decorate.  There are many small images to fill the wreaths.  And the Co-ordinating Dies are fabulous!!

I ended up making tiny cards, that could be used as tags, as well.  For the base of each card/tag, I used the smallest die from the Postage Stamp Edge Dies from Simon.  I cut 4 of these and adhered them together with Scor-Tape.

The wreaths fit perfectly on these small square dies!


There was a lot of die cutting involved on these two little cards but I don't mind at all, especially when all the products are so fun to use!!

Thank you for stopping by!!  See you soon!

Laurie


Monday, April 24, 2017

Super Soft Watercolour

Hello Everyone and Happy Monday!! I'm back on the Studio Katia Blog to share a card made using the beautiful flower image from the Thank You So Much stamp set along with some fabulous dies!

I wanted to go with a very subtle colour so I chose ONE marker.  To see what products I used and how this card came together, I hope you'll stop by and check out the post :)


Thank you for stopping by today.  
Wishing you the best week ever!!!

Laurie


Thursday, April 20, 2017

Floral Background Stamping with Right At Home Stamps

Hi everyone and welcome back!!  Today's post is a little bitter sweet.  I've been so lucky and honoured to be a guest designer for Nicole and Right At Home Shop.  I'm so sad that it's over :(

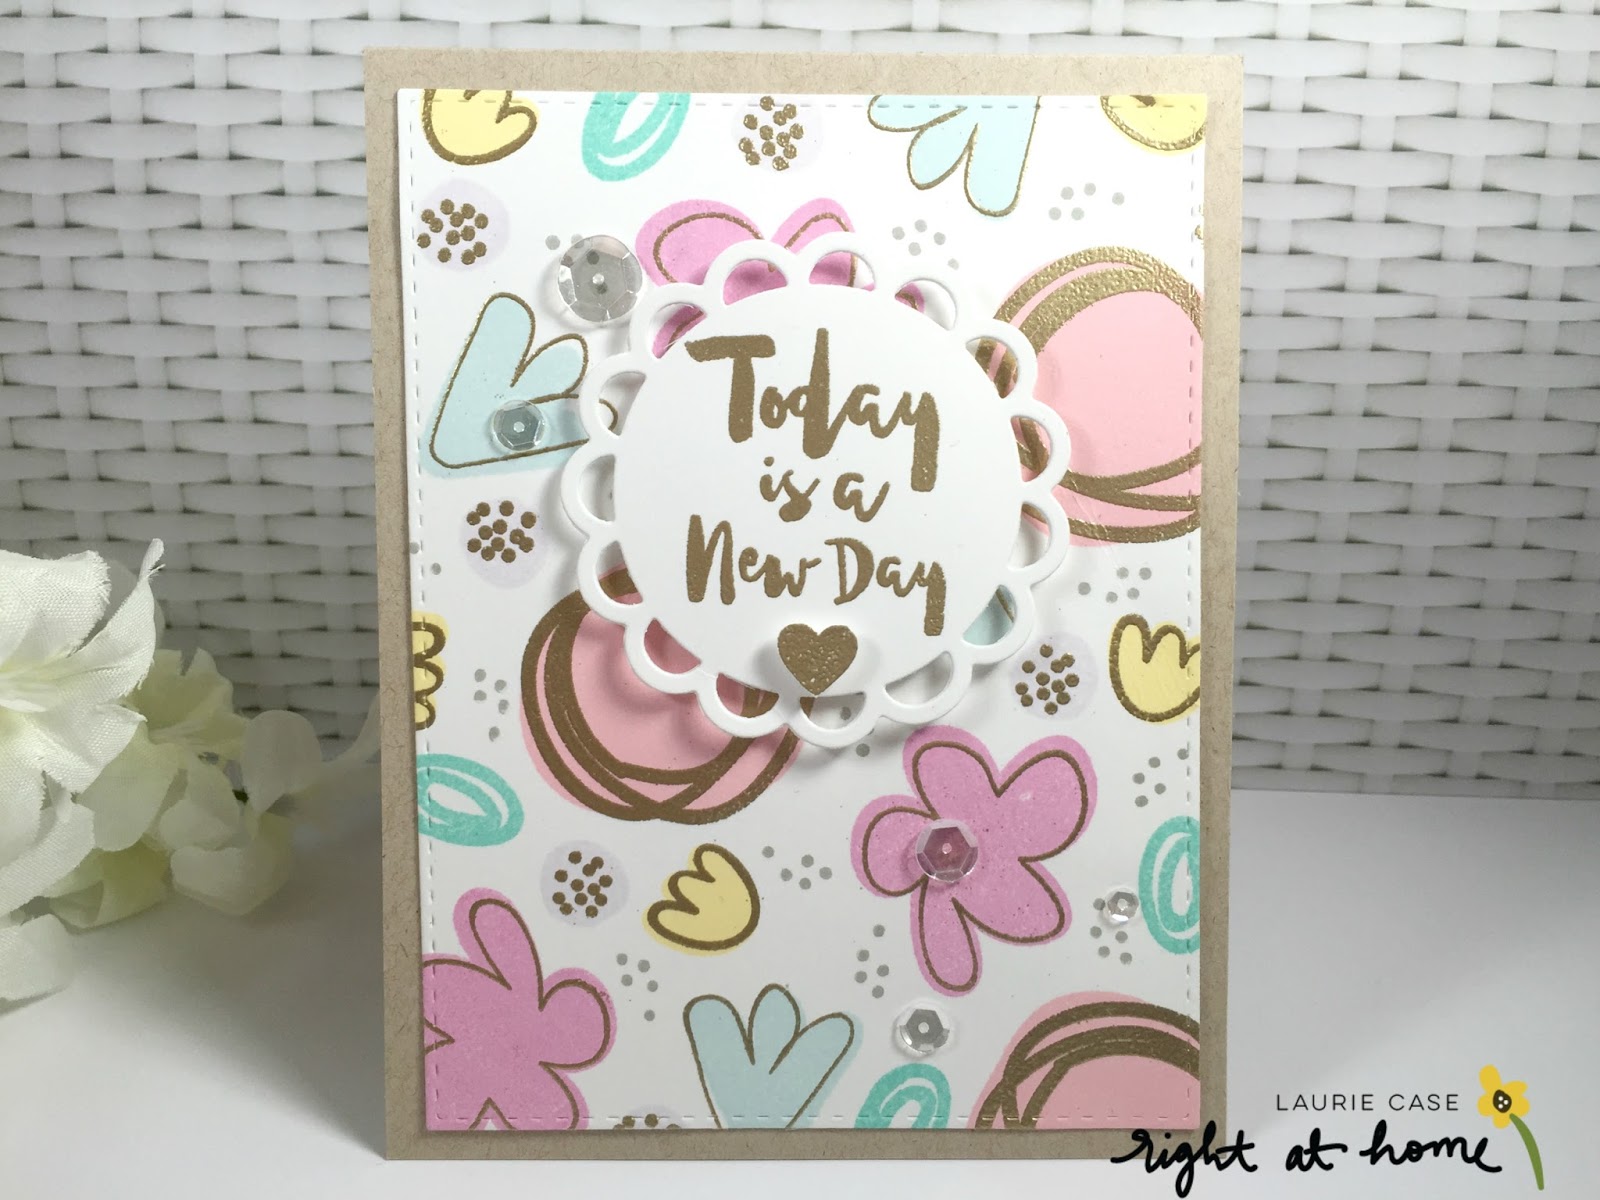
For my project, I decided to make a bright floral encouragement card.  I started by stamping multiple flower images from one of my all time favourite sets,  Abstract Florals. This set is amazing.  It has open images as well as solid images that can be used alone or together.

I used inks from Altenew in Spring colours.  Starting with the largest of the images and filling in the gaps with the smaller images.  Because some of these stamps are quite large, I used my Misti for this.


After the solid images were stamped, I took the matching outline stamp and used Versamark Ink and Gold Embossing Powder to add some shine!  I then used the smaller stitched die from the Find the Beauty Die Set to cut the panel out.


For the sentiment, I used the Get Stuff Done set.  This set was intended for planners but don't overlook this set if you're not into planner stamps!  It has some awesome sentiments and the font is fantastic!  I also heat embossed the sentiment and the little heart (also from the Get It Done set) in gold.  I used a cute scalloped circle die from Your Next Stamp to frame the sentiment.  I popped up the circle and the heart with foam adhesive.  And after adding some Sparkling Clear Sequins from Pretty Pink Posh, I mounted the panel onto a top fold A2 card base made from Neenah Desert Storm cardstock.


Thank you for joining me on my month long journey with Right At Home Stamps!!  I enjoyed every second of it!  And a huge thank-you to Nicole for letting me be a part of her amazing team!!

Thanks for stopping by today!!  

Laurie


Monday, April 17, 2017

You're Spectacular!

Hello everyone and welcome back!!  For my card today, I used the super cute Foxes stamp set as well as the co-ordinating sentiment set, And the Fox Says....


Please stop by the Studio Katia Blog for all the details!!

See you soon!

Laurie


Monday, April 10, 2017

Watercolouring with Hello Alice

Hi everyone and happy Monday!!  Today I'm sharing this card using one of the stamp sets from Studio Katia's  latest release!  And it's a cutey!!  The stamp set is called Hello Alice and features a little girl and her cat, among other little images!


I love how this card turned out!!  And I love this sweet stamp set!  Please stop by the blog for all the details!

Thank you so much for stopping by today!!  Wishing you a wonderful week!!

Laurie


Tuesday, April 4, 2017

Celebrate!!!

Hello everyone!!  I hope your week is off to a good start!  I'm back to share another card with you for Right at Home Shop.  This card combines many RAH products, including the wildly popular Script Greetings Die Set (which will be back in stock soon!).

I started by die cutting the floral images from the Find the Beauty Die Set onto some bright and cheery coloured cardstock. I then took the co-ordinating images from the Find the Beauty Stamp Set and white heat embossed them on each die cut.


I die cut the "celebrate" word, four times out of white cardstock and adhered them together using the Zig Two Way Glue Pen.  My card panel was cut from white cardstock using the smallest frame die from the Find the Beauty Die set.  I blended some Scattered Straw Distress Ink to the middle portion of the panel and did a few water flicks to create some bleaching effect.  The flowers were adhered to the panel using a combination of foam adhesive and tape runner.

I placed the celebrate over top of the flowers, placing adhesive only where the sentiment touched (also, used the Zig pen).  It really looks like the sentiment is floating.  The rest of the sentiment was stamped onto the banner die from the Folded Gift Tag Die Set in grey ink.  To make the banner a bit more dimensional, I cut one from grey cardstock as well, cut it in two and placed it behind the white banner.

To finish, I added some Clear Wink of Stella to the sentiment die cut and the flowers and added a few Radiant Pineapple Sequins.


Thank you for taking the time to visit today!!  Have a great week!!

Laurie


Monday, April 3, 2017

Watercoloring with Distress Oxide Inks

Hello everyone!!  And welcome to another Monday post!  I'm back on the Studio Katia blog today with a card that actually started out as an experiment.  I purchased the complete set of Distress Oxide Inks and really wanted to play with them.  I have made a couple of backgrounds and loved the results.  So for today's post I'll show you how they look when used for watercolour.

I made this card featuring many products from Studio Katia.  I hope you will stop by to see all the process and the details!!


Thanks for stopping by!! See you soon!
Laurie


Featured Post

Patterned Paper and Coloured Cardstock

Hey friends and welcome! I wanted to share a fun shaped card with you using dies from Pretty Pink Posh and Scrapbook.com ! I've been a l...