Tuesday, November 14, 2023

Patterned Paper and Coloured Cardstock

Hey friends and welcome! I wanted to share a fun shaped card with you using dies from Pretty Pink Posh and Scrapbook.com!

I've been a little obsessed with both brands lately. Pretty Pink Posh has been coming out with the cutest stamps and dies lately and I seem to be buying at least one thing from each new release! Scrapbookcom has got some of the best nesting die sets, coloured paper pads and patterned paper pads! I find myself visiting this store more often as their exclusive products, sales and freebies are amazing! (NOTE: I'm in Canada. For whatever reason, this is the only US online retailer that I order from that I always end up paying duties/taxes when it arrives....annnoying but I tend to overlook it because their prices can be pretty good). 

Enough chatter, let's get to the card!


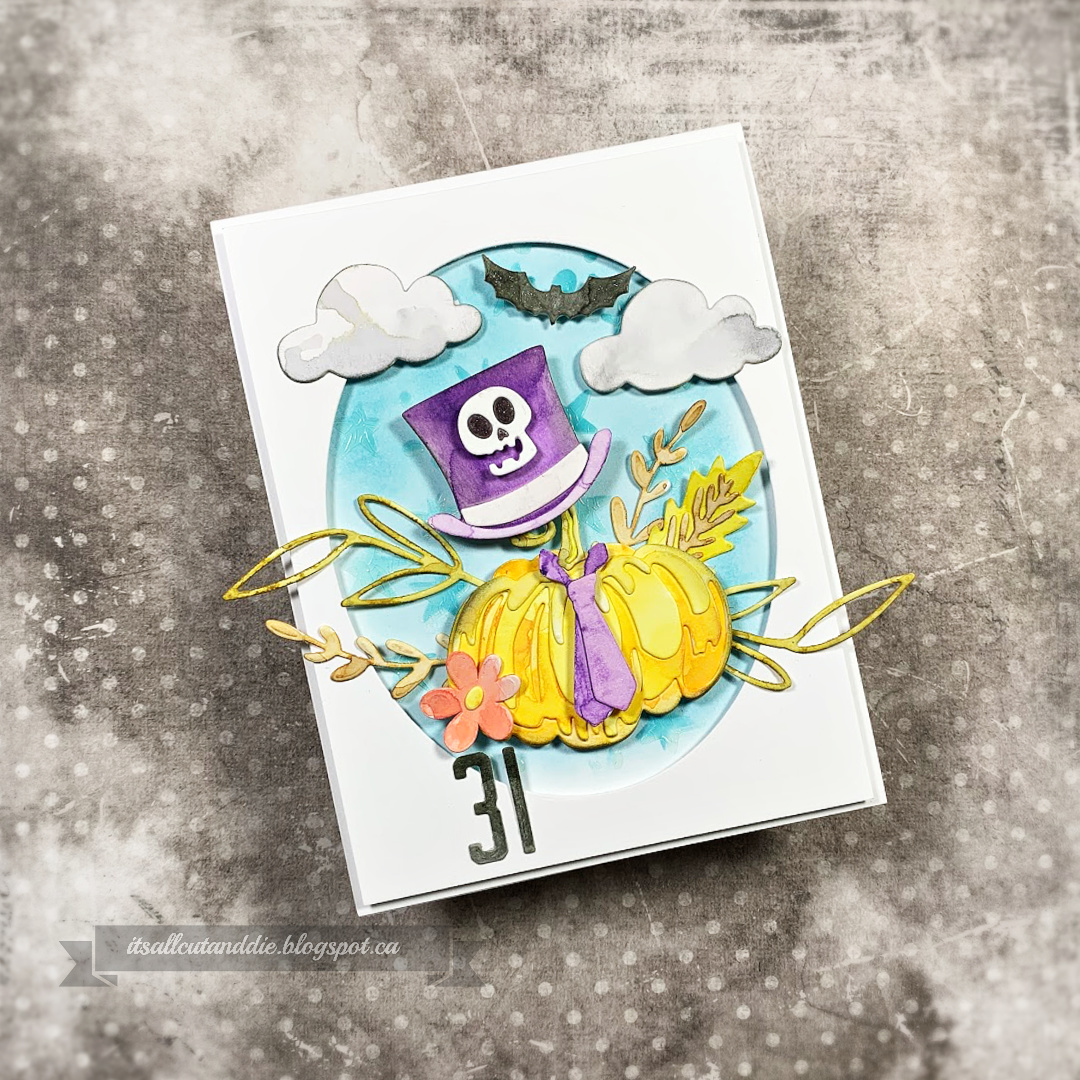
I made a fun, floral shaped card using the Nested Spring Flowers Dies from Scrapbookcom. I ADORE this set of dies!  I simply cut 2 of the largest die out of white cardstock, then another of the same size using pattern paper from an older Photoplay paper pad. I then cut another flower in the next size down, out of white. To make the base, I simply made a score line at the top of one of the largest flowers and used Scor-tape to adhere the two together!

I used a combination of the Mug/Additions dies from Pretty Pink Posh. This includes the : Winter Mug Die (this is the base set) and the Fall Mug Additions. These two sets come with all the dies you see here plus more!!!

All the papers for the mug and foliage are from Scrapbookcom. The mug is cut from my favourite fall paper: Cozy Autumn 6x8 paper pad. The solid colours come from a combo of the Floral 6x8 pad and the Boho 6x8 pad.

After everything was die cut, I used a combination of liquid glue and foam adhesive to attach and adhere everything together...this is quite a dimensional project and one best hand delivered!


I added a few white gel pen details. And a sentiment from and Aall & Create set called Stay Cozy.

I absolutely adore how this card came together! And I hope you do too!!

Before I sign off, I wanted to mention that all the links I've provided are from the shops that I bought each of these products and these are not affiliate links.

Thanks for stopping by!

Laurie


Friday, October 6, 2023

Scrap N Stamp Halloween Hop--Ghostly Greetings!

Welcome to this months Scrap N Stamp blog hop! We, of course, are celebrating none other than HALLOWEEN! You should have arrived from the lovely MEGHAN K!


Full confession here..I do not like Halloween. Even as a kid, I never enjoyed it. However, I do like creating some spooky cards. Well, kind of spooky. More "spooky-cute".

I chose to use a variety of Tim Holtz/Sizzix products for my card today.


I die cut all the pieces from Mixed Media paper. I added colour using the "smooshing" technique with a variety of Distress Inks. This adds colour quickly while creating some fabulous texture! 

I used one of the pumpkins from the Pumpkin Duo Die Set, the hat and tie (which fit perfectly on that pumpkin) are from the Tailored Die Set. The foliage comes from the Funky Florals 2 set. The clouds are from Christmas Cutouts. The little skull on the top hat is from Trick or Treaters and the "31" is cut using the Alphanumeric Nomads set. The small bat is from an older set I had in my stash.

As you can see, all these die sets work wonderfully together and it also shows that I have a bit of an obsession with Tim Holtz dies and die cutting in general!!


To create the background, which is pretty much covered by my focal point, I used Transparent Distress Crackle paste along with the new Spellbound Stencil. I did ink blend some Broken China Distress Ink over it. This was done directly on a white card base.

I die cut an oval window into a card front, foam mounted it onto the base then foam mounted my focal cluster.


Because there is so much texture on this card already, I did not add any sparkle, shine, gems or sequins.

Hope you enjoyed this not so spooky Halloween card! Even though I'm not into Halloween, I had so much fun going through my stash of TH dies and creating!!

Now on to the treats!!

Leave a lovely comment on each stop of this hop for a chance to win a $50 gift certificate to the Scrap N Stamp Online Store!!  You have until October 24, 2023 to leave a comment. Winner will be announced on the SNS Blog on October 31, 2023. GOOD LUCK!!

But here's one more treat for your pillowcase...


Save 25% on select Halloween themed items until Oct 11/23!  Happy Shopping!

YOUR NEXT STOP IS THE WONDERFULLY TALENTED DEEPA!


Sunday, September 24, 2023

Newton's Nook Ink Paw Challenge #207

Hello and welcome back! This week I made a card to enter into the latest challenge from Newton's Nook! I've always been a huge fan of their stamps and dies and decided to use a couple of my favourites. The theme for this challenge is SKETCH. Sketch challenges always gets my creative juices flowing.


Here's my take on this...


I used one of my all-time favourite fall themed stamp sets:  Pumpkin Latte along with its co-ordinating dies. My colouring medium of choice was watercolour pencils which I've been using A LOT lately!

To create the striped panel, I simply used the same colour of pencils that I used on the images to draw 1/2 inch lines on the paper. Then blended it out with water. These particular pencil are permanent when dry to there was no worry on the colours bleeding.


To add some texture to the striped panel, I used the Falling Leaves Stencil along with some white embossing paste. Subtle yet lovely!

I used a border die to create a panel behind the striped piece to add a bit more interest and used foam tape to adhere it to the card base.

I stamped the sentiment on the oval die cut leaving enough room to foam mount the girl. I tucked that cute, pink pumpkin behind her.


I LOVE how this card turned out! Not your traditional fall colours but I think the season is well represented :)!

Thank you for stopping by! Have a great day and see you soon!

Laurie


Friday, August 4, 2023

Scrap N Stamp ALTENEW Blog Hop!

 Hey friends, welcome back!  Today we are featuring Altenew products in this months blog hop for Scrap N Stamp Canada!


Scrap N Stamp has recently started to carry the Altenew line of products which is super exciting! There is truly something for everyone!

For my project, I used the GORGEOUS Peony Sunshine 3D embossing folder. I used a thick, kraft cardstock for this and it worked beautifully!


After the embossing, I trimmed the panel down to fit onto an A2, ivory card base leaving a border. To spice things up a bit, I lightly rubbed a white pigment ink pad over the top. This catches the "high" points of the embossed image and brings out the pattern!


For even more added detail, I took some coloured pencils and added some fairly subtle shading. I used a brown pencil to outline it and it seems to pop of the paper even more!

I just so happened to have a small frame in my "use it up" pile and it worked perfectly to frame the kraft panel. Everything was foam mounted onto the base.


The sentiment comes from an older Altenew set called Painted Butterflies. I did add a few gems but they blend maybe a little too well!

Thank you for hopping along with us today! Just leave a comment below for your chance to win a $50 gift certificate to the SNS online store!

Winner will announced on the Scrap N Stamp Blog on August 29/23.

Thanks for leaving some love and good luck!!

You can find the full list of bloggers HERE (SNS Blog)

Until next time....

Laurie


Friday, July 7, 2023

Christmas in July with Scrap N Stamp!!

 Hello and welcome to the Scrap N Stamp Canada "Christmas is July Blog Hop"! You have arrived from the super talented Kia


The Christmas in July theme is always fun. It breaks up the spring and summer crafting nicely and lets you dig through your holiday -making stash! 

I mixed and matched three different brands for my project today, something which I love to do.


I used the Christmastime die set from Tim Holtz/Sizzix. This is quite a simple die set yet is just beautiful. I chose to cut everything from white cardstock and use a variety of Distress Inks to add the colour. I then glued all the pieces together to create one solid image.

To easily create the background, I started with a piece of light blue cardstock. I simply inked around it using Broken China, then Chipped Sapphire and finally Black Soot Distress Inks. By starting off with the light blue cardstock, it cuts down on the blending time!  I then mixed a bit of white acrylic paint with water and used a paintbrush to splatter. I made sure to go over the couple and the trees to create continuity.

Now, speaking of the trees! I used the beautiful Layered Narrow Pines die set from Memory Box. This set pairs beautifully with the Christmastime die set.  I did the same technique by using Distress Inks to add colour. I used Rustic Wilderness and Peeled Paint.


I used a stitched rectangle die to trim down the background panel. I used the Stitched Hillside Borders from Lawn Fawn to create the snow bank. 

I foam mounted the "snow" to allow for a couple of the trees to be tucked behind. This meant that the cute couple needed some foam adhesive as well.  This is where I realized I hadn't stamped the sentiment...do you ever do that??

Luckily, it worked out okay! I heat embossed the sentiment in white. The "Warm Winter Wishes" comes from the super sweet Stay Cozy Stamp Set from Aall & Create.

The entire panel was foam mounted onto a top-fold, A2 white card base.  To finish off, I added some white, pearlescent pearls.


And that's my finished card! I hope you like it. It was A LOT of fun to make!

Now, onto the fun stuff...

For a chance to win a $50 gift certificate to the Scrap N Stamp online shop, all you have to do is leave a comment on each stop of the hop! This hop is full of gorgeous, Christmas inspiration so it should be very easy to leave a nice comment!

The winner will be announced on the SNS Blog on July 25, 2023.

Thank you so much for hopping along! Good luck!

Up next is the wonderful Mari...enjoy!

Laurie


Monday, June 26, 2023

Simon Says Stamp Monday Challenge!

 Hello and welcome! I thought I'd join in on a challenge today!! I rarely participate in challenges and I don't know why. They are a great way to get the creative ideas flowing. I also find that I make better use of my supplies. With prompts such as layout, theme or colour combination, it tends to make you look at your stamps, dies and inks with fresh eyes.

This is the Simon Says Stamp Monday Challenge. The theme is "Vacation". Typically, the Monday challenge is a vintage theme. My card is definitely NOT vintage. But that's ok!

I used all older supplies, some of which are no longer available or retired...sorry! But that's the beauty of challenges...you can give your older goodies some more love!

I created a pastel, beach themed card. Everything was cut from white cardstock and then ink blended with Distress Inks. I have tons of coloured cardstock which would make this easier but I love the look of the Distress Inks!


I'm pretty happy with the way this card turned out. It's definitely got a relaxing vibe to it.

Here's a list of the stamps and dies I used. Like I mentioned before, some of these are unavailable but worth a search:)

My Favourite Things:  Beach Scene Builder
                                     Beach Bungalow and Accessories
                                     Cloud Stencil
                                     Sunny Vibes Stamp Set
The scalloped frame is the Fancy Frames from Craftin' Desert Divas (oldie but goodie)

Thanks so much for stopping by!  Have a great week!

Laurie


Friday, May 26, 2023

Let's Celebrate with Jane's Doodles

 Hello and welcome!  Today, I'll share a fun card with you featuring a new digital stamp set from Jane's Doodles!  This one is called Surf's Up. This is another fun, must have set.


I have an inexpensive laser printer. I wish it could handle heavier watercolour paper but sadly, it does not. It does, however, handle a 90lb weight mixed media paper. I used an old Canson spiral bound paper book. 
I'm not sure if it's my printer or the paper, but I find that some of the line work will fade or rub off. Easy fix with a fine liner pen though!


I used watercolour pencils to colour the images, then outlined them the best I could. I just had to add some sparkle and shine with a glitter pen and Nuvo Crystal Glaze.


I hope you enjoyed my card featuring this super cute set!

See you soon!

Laurie

Featured Post

Patterned Paper and Coloured Cardstock

Hey friends and welcome! I wanted to share a fun shaped card with you using dies from Pretty Pink Posh and Scrapbook.com ! I've been a l...